Sunday, December 25, 2011

How To Install Windows 7 On a Virtual PC ?

In the previous post, I gave a brief about how to install a VMware virtual PC software on your computer.


Now, I am going to tell you how to install a Windows 7 Virtual Machine in the virtual PC software.
For this, you need to have a windows installer disc or an .iso image of Windows.


Open the VMware Player you've installed as explained here.
Click on the "Create a New Virtual Machine".
 There are two options here. You can install an operating system later. But if you want to install an operating system now, then you again have two options. You can install directly from the windows disk by selecting "Installer Disc" option or you can give the path to a windows image(.iso) by selecting "Installer Disc Image file" option. After you are done, click next.
Now the installer wizard asks you to enter a windows key. If you have one, then you can use it now to install Windows. You can also activate the windows later after the installation. To do this, you have to leave the "Windows product key" field blank.
You can set Username and a password for your virtual machine. Click next.
And a prompt opens if you haven't entered the windows product key. Don't worry about it. Just click yes in the prompt.
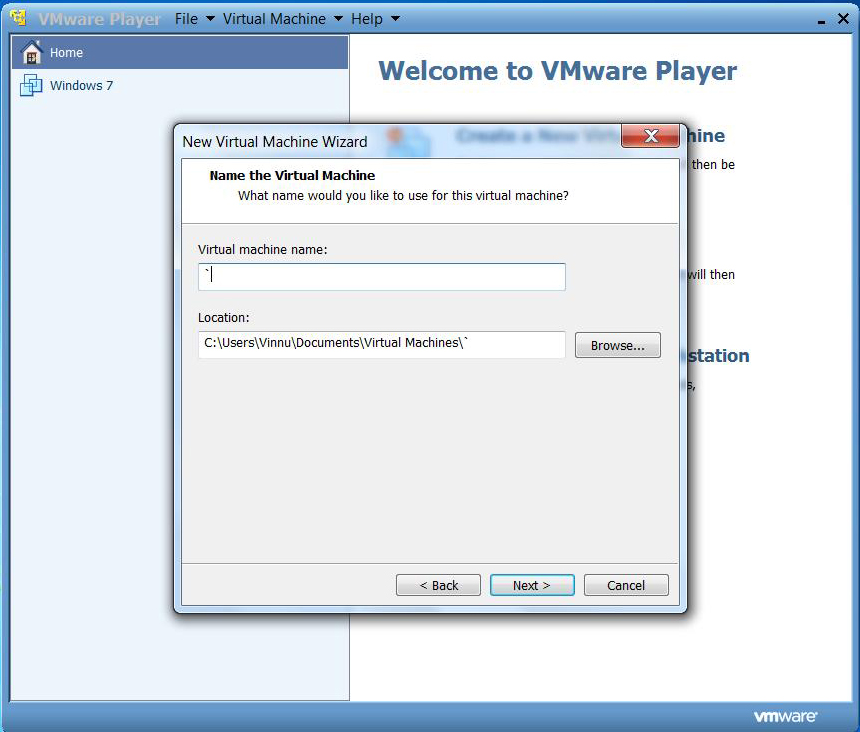
 You must give your virtual machine a name. Like Windows 7 etc. And it will ask you to give a location where it should install the virtual machine. You can leave it or change it as per your will.
This is an important step. VMware or any other virtual pc software uses a file as the machine. This file can be stored as a single file or it can be split into multiple ones. As far as the speed of the virtual machine is concerned, it is better to store the virtual machine as a single file.
And you have to give the maximum disk space that can be occupied by the virtual machine.
Click next.
This windows shows you the configuration of the virtual machine that you have chosen to install. Just click on the "Customize Hardware" button to open a window that shows you the entire properties of the virtual machine that you are installing. When you are done, just close the hardware window and click install in the previous window. This starts the installation of the virtual machine.
Be patient while the VMware player configures the installation of Windows 7 Virtual Machine.
Now you'll be given an option to download and install VMware Tools for windows. You can download or just skip it. Either is safe.
 Windows starts to load files and installation automatically begins. When it is completes, if you are connected to a network, then it will ask you to select the home group settings for that network.


Now you can see the Windows 7 desktop. :)
You can check the properties of your Windows 7 Virtual Machine by right-clicking on the Computer button in the Start menu and selecting "Properties" button. The screenshot below shows the hardware properties of  my Virtual Machine that I just installed.
If you want to close the Virtual Machine, all you have to do is shut down your Windows 7 Virtual Machine. This closes the VMware player also. Or as always you can just click on the cross button on the top-right corner. 
\
Installing a virtual pc software and setting up your Windows 7 Virtual Machine is that simple.


For more help, click on the Contact me page or just comment here. 


EVERY WANTED TO HAVE THE BEST APPS FOR YOUR COMPUTER ? CHECK THIS POST


The Artifex.

How To Setup a Virtual PC ?

In this how-to post, I am gonna tell you how to install a virtual PC in your computer.
Virtual PC is just like another new computer with its won operating systems. The only difference between a virtual PC and your computer is that virtual PC exists inside your computer. Your computer is a combination of hardware and software, but virtual PC is just software which behaves exactly like a fully functional computer.


There are a lot of virtual PC software on the internet. But the best ones are Microsoft Vitual PC and VMware Player.
I will be showing you how to install VMware player on your computer and I will show you how to setup a Windows 7 Virtual Machine.
Requirements:
1. VMware player. Click here to download
2. Windows 7 image. There are about hundreds of downloadable windows images over the internet. Choose as you like.


Double-click the downloaded VMware player installer.
Click Next in the windows that looks similar to the image shown below. 
Choose the destination folder to install the VMware Player. Default location will be in C drive. 
 If you have a working internet connection every time you log on, you can choose this option which will check for product updates every time you log on to your computer.
 This option enables an option which will automatic reports to VMware. This is perfectly safe. I would choose this option. 
 If you are thinking to use this software every now and then, you can place shortcuts automatically on the Desktop and Start menu by checking the respective fields.
 Click continue to start the installation of VMware player with your desired settings.
The setup requires you to restart your PC after completing the installation of VMware player.
This is how you install a VMware player or any other virtual pc software in your computer. It's that simple. In the next post I will show you how to install a Windows 7 Virtual Machine. 


The Artifex.

Friday, December 23, 2011

How To Change Boot Device Priority ?

In any PC there is an option for setting the priority of boot device. In simpler words, you just tell the computer from which drive to load the OS from
Some computers have dual-boot or triple-boot in them. You can install two or three operating systems in a single PC in a single hard-drive or multiple hard-drives. 
When you have different operating systems in different hard-drives, then you will have to manually tell the computer from which hard-drive to load the operating system. This manually telling the computer must be done through the boot device priority menu. 
For some computers, BIOS has the option of selecting the boot device while booting-up.
And some for computers, you must go into the BIOS settings page and then change the boot device priority from there. 
How to open the boot menu ?
It is simple. While starting your computer you may have noticed that some texts appear to the bottom of your screen like "Press F12 for boot menu" or "Del to enter setup" etc. You just have to find out which button leads you where in your PC and enter the same when it is appropriate i.e when your computer starts. If you want to enter BIOS setup, then you must press the button which loads setup. For most computers, it is the Delete button.


--> After opening the BIOS menu, it looks something like this. You'll have a boot menu as indicated in the right side image. 


--> Open the BIOS menu and you can see a menu which says "FIRST BOOT DEVICE" , "SECOND BOOT DEVICE" etc. All that you have to do is just change the priority of the boot devices in the list provided. That is if you want your USB drive (for booting from USB) to be your first boot device, then open the First Boot Device option and select REMOVABLE DRIVES . 


That's all ! You are done with setting up the boot priority for your computer. For more help, visit the Contact Me page or Comment below.FACING TROUBLES STARTING YOUR COMPUTER ? SEE THIS The Artifex.

Monday, October 3, 2011

How To Edit Blogger Templates - Web Design

Everyone knows there are tons of templates for different platforms like blogger, wordpress, joomla. Some like some templates but some doesn't.
In most of the cases you like the templates but you don't like some part of it. But as you couldn't edit the template to change the unwanted stuff you skip the template. Even this happened to me like 50 times. But I did a research on the internet to find out the layout in which blogger templates are published. And I found a great website which gave me an idea on the template layout for blogger.
But unfortunately I can't find that website again. So I have made some stuff myself to help newbie bloggers edit their templates. Hope this helps. Any queries, don't hesitate to click on the contact me tab up there.


You need to have a basic idea on the structure and syntax of HTML and CSS in order to edit templates.
Websites are basically a collection of html, css and javascript each stored in different files that are interlinked to each other. But in blogger, every necessary thing is stored in a single file with xml extension i.e template.xml.
This is very simple. All the HTML, CSS, JS code is written in that single xml file only. So you need to edit the template that you have downloaded from the internet. There is a basic format or layout or structure which every template(most of them) follow. If you know this simple format or structure then you can easily edit the templates and make it look as you like. The entire goal of this post is to give you an idea about how HTML, CSS, JS are organised in blogger templates. So here I start. 


As you know everything is present in our brain only like controlling the functions, maintaining style etc. In the same way, every necessary stuff including the css and javascript are placed in HEAD tag only. One thing, there are somethings called VARIABLES in blogger templates. They say how to style the basic style in blogger like fonts, font colors and all that. You need not change anything in VARIABLES. If you want to change the font colors etc then you are free to change them. 
This image to the right shows the basic layout of a blogger template. 


So, VARIABLES, JS, CSS are placed inside head tag. Most of the work will be regarding placing of the elements i.e with the help of CSS. So editing CSS will be the very important part in editing the template. 


Variables look some thing like this.


/* Variable definitions
   ====================
   <Variable name="bgcolor" description="Page Background Color"
             type="color" default="#fff" value="#ffffff">
   <Variable name="textcolor" description="Text Color"
             type="color" default="#333" value="#333333">
  --------------------------------------------------
             type="color" default="#666" value="#666666">
   <Variable name="descriptioncolor" description="Blog Description Color"


*/

I need not tell you what javascript looks like. It has all this randomly thrown alphabets, symbols, numbers inside it. LOL Remember, Javascript is placed right next to Variables only. But we need not change anything in JS. It wont be of much help. 


Let me show you how CSS in a blogger template looks like. 

<style type='text/css'>
body{background: #222222 url(https://blogger.googleusercontent.com/img/b/R29vZ2xl/AVvXsEj1vGl8lVgcQvHjAAZDXuNuphdVs1Q7MzyeRk0JYWQEg6Mc37-tuegwFAsYW5mbomnLhEu1bnjnpA-obYBWUzaVT5dOUMMdltTICyIOjupRSKLvQ3IxctB43tz7h05426axEWiqg62ezXqS/s1600/background.png) left top repeat-x;color:#ADADAD;font-family:Arial,Helvetica,Sans-serif;font-size:13px;margin:0px;padding:0px 0px 0px 0px;}
a:link,a:visited{color:#F2A30B;text-decoration:none;outline:none;}
a:hover{color:#CB6D01;text-decoration:none;outline:none;}
a img{border-width:0}
#body-wrapper{margin:0px 0px 0px 0px;padding:0;}
blockquote{overflow:hidden;padding-left:9px;font-style:italic;color:#666;border-left:3px solid #d9cbc3;}
------------------------------------------------
.menu-primary li li .sf-sub-indicator{padding:8px 13px 0 0}
n4/Y-QtdCp76qM/s1600/widget-list.png) left 12px no-repeat;border-bottom:1px dashed #747474;}
AAAAEq4/qpgAHAOe9x0/s1600/comment-avatar.jpg);width:32px;height:32px;float:right;margin:5px 10px 5px 5px;border:1px solid #ddd;position:absolute;top:5px;right:5px;}


.widget-wrap{list-style-type:none;list-style:none;margin:0 0 15px 0;padding:0}
h3.widgettitle{color:#EDECEC;background:url(https://blogger.googleusercontent.com/img/b/R29vZ2xl/AVvXsEjd2sefhSU2pNULy65sc_ju-j3Fb3H_w4rWCUOJ_6K710utmzkTHHO4SHGfuRJl721lgILB-JmESVsELlPgZtWJ3gjARKK24oaQYJb8ofOdgY59KqsYRd2B25ogEEUV5BBIAf72hatcgkZ9/s1600/widget-title-bg.png) left top repeat-x;font:bold 14px/14px Arial,Helvetica,Sans-serif;margin:0 0 10px 0;padding:11px 0 11px 10px;text-transform:uppercase}
-----------------------------------------------------
24{width:938px!important}.last{margin-right:0;padding-right:0}
.last,div.last{margin-right:0}
</style>


Remaining everything like the original html i.e your templates content will be available in the <body></body> tag. 
But each and every div or span tag will be associated with a style class. It is very difficult to find out the respective style class and edit for that div or span tag.
The best way to do this is by using F12 feature in Google Chrome. upload the template to your blog. Open your blog in Google Chrome and press f12. This is a graphical interactive representation of your blog's source. That means your blogs content i.e your templates content will be interactively displayed in Chrome if you press the F12 button. Below will be the source and above will the source's graphical result. You can select and scroll through all the content of your blog's template. The selected element in the page's source will be highlighted in the graphical view of the page. 
So you can easily find out which style class is linked to which page element and you can easily change it in html editing software like Adobe Dreamweaver. 


Thus you can happily edit the template and customize it to suit your style.


If you have any queries please feel free to hit the "Contact me" button in the top. I will respond to them ASAP. 


I can edit your templates if you are facing any problems. Feel free to contact me.


WANT TO TRY OUT NEW OPERATING SYSTEMS BUT HAVE A SINGLE HARD-DISK ?? DONT WORRY

The Artifex.

Friday, September 30, 2011

10 Must Have Apps for Windows 7

In this post I am gonna tell you the most useful and handy applications for Windows 7. 
 These apps make working with Windows 7 a breeze.


 1. Revo Uninstaller Pro
 Revo Uninstaller Pro is an awesome application from VS Revo Group. They charge you to download the full application. But the features provided by this one are simply awesome. Let me explain you briefly about all the features. To name, these are just a few.

  • Uninstaller : You can uninstall any installed application on your PC through this menu. What's special is that, it searches for all he left-over files and registry items of the uninstalled application and deletes them too. thus saving your space. 
  • AutoRun Manager : Through this menu you can see what applications or processes are starting when your PC starts and can remove them from being starting during system start. Thus saving your start-up time.
  • Junk Files Cleaner : This menu scans your system for any unwanted files and removes them at the click of a button. :)
  • Browsers Cleaner , Windows Cleaner, Microsoft Office cleaner : These menus clean the history from their respective fields like browsers or windows or MS Office.

 2. Google Chrome
The best browser that is ever released into the internet world. The features are very useful. And every thing is just very user friendly. 
The new tab is just awesome. It has the installed apps, recently closed websites and most visited ones too. It has the Bookmarks toolbar right there providing easy access to our important sites. 
Most other browsers crash sometimes, but Chrome rarely crashes. If it crashes then you need to upgrade your flash sometimes.
I bet this is the best browser one can get. Google always creates the BEST. 
Get it here


3. WinRAR
WinRAR is an archiver and multi-format opener tool. Using winRAR you can create zip files and rar files too. The best feature is that this can open wide range of file formats even .iso. This is just awesome. 
Every time I format my PC, winRAR is the first application I install. Get it here


4.VLC Media Player
The best media player one can find. The features are awesome. You don't really need a mouse to operate VLC player. Every function has its keyboard shortcuts. 
The 400% volume feature is my favorite one. Even though your audio is not good, you can get the best out of it by increasing the digital audio output to 400% in VLC. 
It outruns Windows Media Players in every possible way. Get it here.


5. Bit Torrent :
A torrent downloading application to download or share torrent files through peer-to-peer file sharing network. I don't really need to talk about this. Everyone knows better because who doesn't know about P2P in this tech world ? 


6. Microsoft Security Essentials
The simple and secure anti-virus program by Microsoft. The best in class. Has millions of users around the globe. The best part of MSE is that it is simple. And it integrates into windows updates. So you will find it very easy while updating the definitions of anti-virus.
I recommend everyone to replace their old anti-virus programs with Microsoft Security Essentials.

7. Notepad++
It is a replacement to the famous windows text editor NOTEPAD. This has so many nice features which are not found in Notepad.  IT is not only a text editor, it has multi-formats embedded into it. You can open multiple files in the same single window just like web browsing. This is 200times better than any other text editor available on the internet or I see it that way. 
Install it to try it. You can find it here.


8. EasyBCD (for Advanced Users)
It is only for advanced users. It is related to core windows programs like System Restore, Restoring MBR, etc. 


9. Picasa
Image editing and album making software from Google. It interacts with the online image storage system called Picasa Web Albums. You can edit simple images in Picasa. The best feature is the image viewing feature. Install this and open any image and you'll know what i mean. Find it here.


10. Tera Copy :
A replacement to file copying in Windows Explorer. You can copy multiple files and folders. This software pauses the second copy until the first copy or move finishes to speed up copying. You can even shut-down your PC after the copy or move finishes with just a click of a button. It maximizes the speed of copying by optimizing the PC performance. Must have app for any windows user. Download it from here.


These are only 10 applications that Computer Brahma recommends anyone installing in their PC.

HAVE YOU TRIED CHANGING THE LOOK OF YOUR SAME OLD WINDOWS PC ?

The Artifex.

Tuesday, September 27, 2011

How To Make Your Windows Look Like Mac - Just For Fun

Finally, I solved the puzzle. The post I found at MaherHacker was not at all clear to newbies. Some requested me to elaborate it. So I added some of my own stuff in this post to make the process easier.
Being frank guys, your PC won't exactly look like Mac. Nothing changes except few features like, mouse button, rocketdock, wallpaper, mouse click sounds. Try this out only for educational and fun purpose only.

And make sure guys you follow everything exactly as i say. You cannot regret after making a mistake. Because all you will be left with is a hard-drive with corrupted OS. Don't panic or worry guys, Computer Brahma is always to help you. Any help you need, do comment your question here. I will answer ASAP.


Here we go,


STEP- 1:
Download the MacFiles.Zip from here.
Extract all the files to somewhere in your hard-drive, a place where accessing the files will be easy like Desktop.


STEP-2:
Open the Rocketdock folder and install it by double-clicking the file "RocketDock-v1.3.5.exe".
After installing it, there are two replacements that you have to do. Let me explain those.
1. Copy the folder "Stardocklet" from Rocketdock folder to "C:\Program Files\RocketDock\Docklets"
2. Copy the folder "Nabs osx leopard" from Rocketdock folder to "C:\Program Files\RocketDock\Skins"
3. Open "Nabs osx leopard" folder and copy "indicator.png"  to "C:\Program Files\RocketDock\Defaults\DefaultIndicator". Replace it. 
We are almost done.


STEP-3:
This is the easiest step of all.
Download this extremely useful file called TakeOwnership from here.
Extract it to somewhere and double-click the InstallTakeOwnership.reg. It will ask you whether you want to add the values to registry or not. Click YES.
This is very important. If you don't do this step correctly, your windows will crash when you try to revert back to old Windows 7 look from Mac look.
So do the next step correctly.
GOTO--> "C:\Windows\System32" and find the file "uxtheme.dll". After you find it, right click and click the first option i.e "Take Ownership".
After you take ownership of the file rename "uxtheme.dll" to "uxtheme.old".
Now immediately copy the "uxtheme.dll" from the folder Apps (Downloaded MacFiles.zip in the beginning) to the system32 directory i.e "C:\Windows\System32".
What you have done here is you backed up the original "uxtheme.dll" as "uxtheme.old" and replaced it with patched version of "uxtheme.dll".


STEP-4:
All that is left is installing the theme. You can do it by copying both "X" folder and "Leopard X.theme" from "Mac Theme for Windows" folder to "C:\Windows\Resources\Themes"
Double click on Leopard X to install your new theme. Hold on, it takes a while. Don't worry.


Now click on any empty space on the desktop and de-select "Show Desktop Icons" form the view menu.


Now open Rocketdock from Start.  Right click on the dock and set screen position to bottom. Right click again and open Dock Settings. Select the General tab on the right side and check "Run at start-up".


Thats it. You are done.
You have a Windows PC which looks like a MAC. Remember, it just looks like MAC.


If you don't like and want to get back the old Windows look, then right click on the desktop and click "Personalize" and set any of the Windows default themes.
Now go to "C:\Windows\System32", right-click on "uxtheme.dll" and click "Take Ownership". Now delete this file. Rename the file "uxtheme.old" to "uxtheme.dll"
Right click on the desktop and select "Show Desktop Icons" from view menu. And uninstall "Rocketdock" from control panel.


Done. You got back your old Windows look which is more awesome. :).
You need any help, contact me at mvpspl619@gmail.com.


This is just an experiment.


HAVE YOU CHECKED THE LIST OF APPS THAT YOU MUST HAVE ON YOUR WINDOWS ?


The Artifex.

Technology Review - Near Field Communication (NFC)

Tired of carrying lots of bank cards, money, id cards etc in your wallet ?
Want a futuristic mobile phone which can replace all these ?


Google got the same idea and implemented it. The result is Google Wallet.


You can use a mobile phone installed with Google Wallet and make transactions at shops, restaurants, taxis etc. It replaces the need of carrying money or credit card. The application has all your bank data including credit card numbers etc. Everything you need to do in order to complete a transaction is to just wave your phone near the NFC enabled sensor or just touch your phone to the NFC enabled sensor.


YES, you got me right. NFC. Near Field Communication. It is the next generation technology which can transfer huge amounts of data between multiple NFC enabled devices when placed at very short range.
In order to use NFC, your device must be pre-installed with NFC chip in its hardware.
NFC is like bluetooth. But a lot of differences and pros and cons. Bluetooth works even at larger distances like 5mts but NFC works only at short distances. Bluetooth can transfer speeds upto Mbps only while NFc can make it upto Kbps.
NFC replaces both BlueTooth and WiFi. Tap an NFC enabled device with NFC enabled router to start using the router's WiFi.
Sad thing is that NFC doesn't support security. But guys this is just the beginning.


Just look at the sample below to know what exactly NFC can do.
7:30 - Eric gets on a train to go to his office, using his NFC-enabled phone to tap a reader and easily open the turnstile. 
7:32 - He sees a poster announcing a free concert that evening. He touches his NFC-enabled phone to the N-Mark on the poster, which transfers the detailed information onto his phone. He reserves seats for the concert with his mobile phone, using mobile communications (e.g., SMS, internet, packet-based connections), and the complimentary tickets are sent to his mobile phone. He sends a text message to his wife to invite her to the concert and dinner.
8:15 - When he arrives at his office, Eric touches his NFC-enabled phone to the office gate to unlock the security mechanism. 
Noon - At lunch time, he pays for his meal using one of the credit cards stored in his phone.
13:00 - After lunch, Eric visits the office of his new business partner for a meeting. Those attending the meeting exchange electronic business cards, stored in their NFC-enabled phones, by touching their phones together. 
18:00 - Eric meets his wife and they go to the concert venue. He touches his NFC-enabled phone to a turnstile at the entrance to the venue, their reservations are confirmed, and they are admitted. 
20:00 - After the concert, they visit a shopping center, where they make a few purchases and have dinner, using their NFC-enabled phones to pay for everything.
22:00 - When they arrive home, Eric realizes that he left his NFC-enabled phone on the train. He immediately calls the mobile network operator and makes a request to disable all active NFC services in the phone. If his phone is later found and returned to him, he will be able to reactivate these services.


CHECK OUT HOW TORRENT DOWNLOADING WORKS, IT'S INTERESTING :)


The Artifex.

Friday, September 23, 2011

Must Have Apps After Rooting Android

So you are done with rooting your Android safely. Next is the most important step. Because what's the use of rooting your Android if not installing awesome apps.

I'll give you a list of apps which every Rooted Android user must have.
The list goes like this.


  1. Titanium Backup : Backs up every app, appdata, system data on your SD card. You can restore all the data if something wrong happens to your device data. Must have App.
  2. ROM Manager : This app lets you install any custom ROM onto your device very easily. ROMs may vary from app packages, custom ROMs, kernel etc. 
  3. Juice Defender : This apps defends the juice flowing out of our battery. Chill guys. This is a battery conserving app. Must have as Android phone's battery wont last long. 
  4. Root Explorer : This app is like a file manager but it enters into the creepiest corners of your Android device using the root permissions. 
  5. Wireless Tether : This apps helps in creating a wifi or PAN from your device so that other devices can use your phones Internet connection as WIFI to access internet. Must have for hardcore networkers. 
  6. AdFree Android : The name itself explains the app. It blocks almost every ad while using Android whether it be while browsing or app ads. 
  7. CacheMate : This app helps in clearing the cache data on your device. Thus it helps in freeing up some memroy. 
  8. SetCPU : This app helps in setting custom clocking rate of your CPU. Recommended for advanced users.
These are the most important apps a rooted Android must have. Any changes will be updated. 

Check this space for updates. 

Happy Androiding.
The Artifex.

How To Make a Bootable USB Drive

Sometimes we may find it trouble some to install Operating System from CD/DVD. So here comes the chance of installing an OS from a USB. The secret is that we are making the usb BOOTABLE.


As simple as that.


Old school junkies used to prefer a command-line method to make a USB thumb drive bootable. But come on you junkies, world has become more software-dependent. There a bunch of softwares which will make the process easy for us.
A few simple quicks, and there will be a Bootable USB right in our hands.


Some of the softwares are listed below.


  • UNetBootin : A software to write bootable USBs for LINUX operating system. This is the best software available for LINUX OS. Download it here.

  • Win7 USB/DVD Download Tool: A tool made by the Microsoft to burn windows images into USB and DVDs. Download it here.

  • PetoUSB: Another tool to make bootable USB drives. Download it here.

  • WinToFlash: Tool to make bootable USB drives from .iso files. Get it here.

  • Make USB Disk Bootable: Another great tool which uses command-line interface to create bootable disks. Get it here.
All the above tools work perfectly. Use them, Review them.


For more help contact me at mvpspl619@gmail.com


WANT TO CHANGE BOOT SETTINGS ??


OR HAVING TROUBLES IN STARTING YOUR COMPUTER ??


The Artifex.

Windows 7 & Windows 8 Developer Preview DUAL-BOOT

As you all know, Windows 8 Developer Preview is released a few days ago. It is awesome.


The UI of the New Windows Developer Preview is just awesome. Everyone falls in love with it at first sight.


This post is to guide you step-by-step to install a dual boot windows Developer Preview with Windows 7.


Download links for Windows DP:
Direct Download
Torrent Download - 32 bit
Torrent Download - 64 bit


How to Install Windows Developer Preview in a PC with Windows 7 ?


Its very simple and easy. Just follow the below given steps. You'll end up with an awesome version of Windows along with Windows 7.


Step - 1:
Download the right version of Windows Developer Preview either 32-bit or 64-bit. I would prefer torrent download. ;)


Step - 2:
Burn the downloaded .iso file into  an empty DVD or make a bootable USB(Read my post how to make a bottable USB here). Once burned, Insert the disk or pendrive into tray and restart your PC.


Step - 3:
Wait for it to load the OS from the respective drive (DVD or USB).
You have options for installing the OS. You can either install it into a separate partition or a new hard-drive. If you haven't done a new partition before then shrink any partition with more free memory. Create a small partition about 100GB.
Now you select this disk as the primary for installing the OS and continue.


Step - 4:
It gets completely and shows a blue screen to select the operating system. Now you want to set the default operating system as WINDOWS 7. So click on the text link below which says something about change default settings etc. Change the default OS to Windows 7.
You can select which operating system to load everytime the PC starts.


Login into Windows Developer Preview.


Done! You have a perfectly synchronized PC with Windows 7 and Windows Developer Preview dual boot.
Enjoy working with the next awesome version of Windows.


For more help regarding Windows Developer Preview and Dual Boot contact me at mvpspl619@gmail.com


CHECK OUT THESE AWESOME APPLICATIONS FOR WINDOWS !


The Artifex.

Wednesday, September 21, 2011

How to Root an Android - A way to exploit Android

Have you ever heard of jail-breaking an I-device ? like the ipod touch, iphone, ipad etc ?


Jail breaking is a process of exploiting every resource of the device. The possibilities are almost endless. You can install applications which are not on the Apple iTunes store. You can do anything on your jail-broken device that Apple doesn't want you to do.


Coming to Android, ROOTING replaces i-device's JAIL-BREAKING. You can achieve endless control of your Android phone only by rooting it.
Rooting is a process that allows users of mobile phones and other devices running the Android operating system to attain privileged control (known as "root access") within Android's Linux subsystem with the goal of overcoming limitations that carriers and manufacturers put on some devices. It is analogous to jailbreaking on devices running the Apple iOS operating system.
The name root comes from the Linux operating system world, where the most privileged user on the system (otherwise known as Administrator on Windows) is called root.
Device manufacturers and carriers cannot prevent rooting because the rooting process exploits a vulnerability in the operating system or the device drivers which installs a custom app called SU(Switch User) into the OS. This program is the one which provides root access to the programs that request it. 
Another program called Superuser Permissions is usually bundled with all root methods. It gives you a chance to approve or deny requests from any application that wants to utilize root. Superuser Permissions essentially replaces the conventional root password with a simple Approve/Deny prompt, which isn't as secure as having a password, but is far more convenient on a mobile device. 


There are a lot of ways to root your Android device. But each one is applicable to a particular set of device models. Best way to root your device is to Google "YOURDEVICENAME root" and apply the proper method. 
Remember there a risks and advantages of rooting your Android device. The risks are you lose your device warranty and may brick your device if you don't root it properly (slim chances).


Advantages of Rooting:
  • Full Control Over Android
  • Backup and Restore the whole system
  • Install Custom ROMs
  • Saving phone memory (Using Custom ROM to move apps to SD card)
  • Run special applications
More info about custom ROMs and Special Applications in the upcoming post. Keep watching this space.


Happy Androiding.


WANT TO HAVE THE BEST APPS FOR YOUR ANDROID ? CHECK THIS OUT


The Artifex.

Friday, September 16, 2011

Technology Review - Touch computing


The latest touch technologies are listed below. 
  • Microsoft Surface
Surface is a touch activated tabletop computer released by Microsoft.

It looks like a shining carom board. At a time four users can operate on the new Microsoft Surface.

It has object recognition technology. Microsoft says Surface connects digital world with practical world. so far Surface keeps up with this note.
For more info, click here.

  • CleanKeys
CleanKeys is the world's easiest to clean keyboard. Cleankeys is a solid-surface, touch-sensitive keyboard, that can be easily wiped clean. The advantages of using CleanKeys are listed below.
  1. There are no gaps between the keys.
  2. Its unique TouchTap™ surface allows the user to rest their fingers on the keyboard, even though it is touch sensitive
  3. It is smart enough to know the difference between when you’re typing and when you’re just resting your fingers, which helps make it comfortable and easy to type
  4. Most importantly, it is easy to clean and disinfect; the keyboard is completely sealed and can be cleaned and disinfected in place, saving time while at the same time being more effective.
For more info about CleanKeys, click here.
  • Magic Mouse - Apple
The world's first multi-touch mouse. People say this is the best mouse that Apple ever produced. It has built in wireless. The sad thing is that only Mac supports this mouse. So this is limited to Mac users only.
The touch features of Magic Mouse are really perfect. Double clicking,  Scrolling, Panning, Zooming, Right clicking is supported by this mouse.
Click here to find out more.

The Artifex.

Related Posts Plugin for WordPress, Blogger...