Monday, January 16, 2012

How To Create Java Programs ? Steps To Start Off With Java

How To Create Java Programs ? Steps To Start Off With Java. How to Install Java Platform and Eclipse IDE

Are you a programming lover ?

Do you want to apply real time principles to create awesome programs applications for web or mobile or any other device ?

Then JAVA is the answer.

Java is the best available Object-Oriented Programming language ever created.
Ask any expert programmer what his favourite OOP language is, you will definitely hear Java back !
Java is that awesome.

In this tutorial I will just start you with installing the necessary pre-requisites to start writing excellent Java programs.
You will need some databases and development environments to speed create Java programs.

Let's get started!

Writing Java programs require you to have a Java Platform already installed on your PC.
This is just like Turbo C which you install to create C or C++ programs.
Technically speaking, you are installing Java compiler which runs and compiles the Java programs that you will create.
So installing Java Platform is a necessary and important step in creating awesome Java programs.

Oracle now owns everything that's related to Java which was previously owned by Sun microsystems.
We can get the Java Platform from the Oracle website itself.
Follow this link to download the required Java Platform for your operating system and workstation.

Windows 32-Bit Download Link
Windows 63-Bit Download Link
Other Platforms Link (Linux/Solaris)

After you have finished installing Java Platform, you can start writing Java Programs instantly. But as you don't have IDE i.e Integrated Development Environment.
This is just like a user interface to coding java programs. Without installing an IDE you will have to write programs in command prompt. There is a way of writing programs in command prompt. But I am not going to explain you about that because there is an awesome way of coding Java programs using IDE.

A very famous IDE for coding Java programs is Eclipse.
Eclipse is an IDE which uses the Java Platform at the back end and takes care about the coding and output at the front end.
There are a different versions of Eclipse available for different tasks. For example Eclipse for Developing JavaScripts, Eclipse IDE for C/C++ developers etc. We use any one of the two from the download page which is given below.

Complete List of Eclipse IDEs

Download either Eclipse IDE for Java Developers or Eclipse Classic. Eclipse Classic is preferable because of its versatility. In the future if you want to code Android programs, Eclipse Classic is preferable.

Just download any of the either explained above.
After you finish installing Eclipse, start the application.
Now you have to create a Java Project inorder to go any further in coding Java programs. Every program must be located in a Java Project. So now create a Java Project as shown below.
That's it. You are ready to go. In the next step lets create a sample class in a Java Project named "Project" which is my project that I use to code Java Programs. You may or may not understand any further from here. I am just showing you how to create a class in Java. Later I will give you a link to a youtube.com Java tutorials. Those tutorials will help you get started with coding real Java programs. Follow the image below to create a class.
Now follow this Youtube link right below to help you get started with Java programming.

Java Tutorials Complete
This is an awesome series of COMPLETE Java tutorials.

Happy Programming.

P.S: If you gained any knowledge from this post, Please SHARE it. Sharing is Caring :)

The Artifex.

Saturday, January 14, 2012

How To Create Multiple User Profiles In Google Chrome ?

How To Create Multiple User Profiles In Google Chrome ?

Each and every user of Google chrome or any other browser might have come across a situation where you have to log out for using another email id or a social networking account.


Trust me; This is one of the hectic job any internet-user has to do.


This Is Trouble No More. Google Chrome has a new feature called "USERS" in order to remove the fore-said problem.


You must install the latest version of Google Chrome in order to get this feature. Or you can simple update your existing Chrome to the latest version.


For updating your already installed chrome, just click on the wrench icon below the X button and select "About  Google Chrome". It will be updated automatically. Don't close this little window until it gets updated completely.


Coming to this new feature, it requires just a click to switch between different accounts or email addresses. 


How to Get This New Feature ?
After you get the new version of Chrome, click the Wrench icon right below the X button and select Options.


In the options menu, select "Personal Stuff". Or just copy and paste "chrome://settings/personal" into the browser and press enter.


You will see a new option named "Users" right below the "Sign in" option. They are the different users that you may set-up to access different accounts or email addresses. 
You can select pre-loaded images given there in order to differentiate between the users.
After you set-up the required users, all you have to is open the respective user and store your email id or social networking account credentials. 


Now you may wonder, "How do I switch between these users ?"
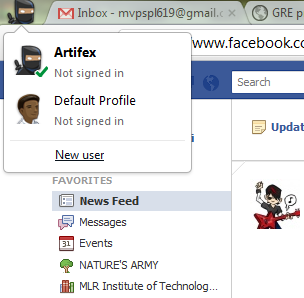
Don't worry. Just take a look at the TOP-LEFT corner of your chrome. 


Surprised ?


That is the image of the respective user that is currently active. 
To switch between users, all you have to do is just click on the image at the top-left corner of the browser and select the required user from the drop-down menu.
If you want to add a new user, you can do it from the drop-down itself.
It's That Simple.


For Any Queries, feel free to contact me. 


Happy Browsing.


The Artifex.

How To Access Facebook On Mobile Without Internet ?

How To Access Facebook On Mobile Without Internet ?

This tutorial shows you a new revolutionary way of accessing Facebook on your mobile phone without Internet connection.

Shocked ?

It is completely genuine. 
Facebook has recently tied up with Fonetwish and came up with this brilliant idea of accessing Facebook without Internet connection on your mobile phone.This feature is developed by U2opia mobile.

This is as simple as checking your mobile balance. People dial a number similar to *111# to get their mobile balance displayed in the screen. Accessing Facebook is as simple as that.
All you have to do is just dial *325# on your mobile phone. It then asks you to enter your Facebook email id, the email id you use to login into facebook. And after that you must enter your password in the next prompt.
Then you will be shown a menu. That menu includes
--> News Feed
--> Wall Posts
--> Notifications
--> Manage Friends
--> Update Status
--> Chat

You can even add friends on facebook by simply dialing *325*FRIEND'S PHONE NUMBER# to add friends instantly.

Please check out this video below to know more about Facebook Mobile (WITHOUT INTERNET).
Happy Facebooking.

Please share this post to spread this great piece of information.
Remember, SHARING IS CARING.
P.S: If it doesn't work on your service provider, please comment in the below section.

The Artifex.

Sunday, December 25, 2011

How To Install Windows 7 On a Virtual PC ?

In the previous post, I gave a brief about how to install a VMware virtual PC software on your computer.


Now, I am going to tell you how to install a Windows 7 Virtual Machine in the virtual PC software.
For this, you need to have a windows installer disc or an .iso image of Windows.


Open the VMware Player you've installed as explained here.
Click on the "Create a New Virtual Machine".
 There are two options here. You can install an operating system later. But if you want to install an operating system now, then you again have two options. You can install directly from the windows disk by selecting "Installer Disc" option or you can give the path to a windows image(.iso) by selecting "Installer Disc Image file" option. After you are done, click next.
Now the installer wizard asks you to enter a windows key. If you have one, then you can use it now to install Windows. You can also activate the windows later after the installation. To do this, you have to leave the "Windows product key" field blank.
You can set Username and a password for your virtual machine. Click next.
And a prompt opens if you haven't entered the windows product key. Don't worry about it. Just click yes in the prompt.
 You must give your virtual machine a name. Like Windows 7 etc. And it will ask you to give a location where it should install the virtual machine. You can leave it or change it as per your will.
This is an important step. VMware or any other virtual pc software uses a file as the machine. This file can be stored as a single file or it can be split into multiple ones. As far as the speed of the virtual machine is concerned, it is better to store the virtual machine as a single file.
And you have to give the maximum disk space that can be occupied by the virtual machine.
Click next.
This windows shows you the configuration of the virtual machine that you have chosen to install. Just click on the "Customize Hardware" button to open a window that shows you the entire properties of the virtual machine that you are installing. When you are done, just close the hardware window and click install in the previous window. This starts the installation of the virtual machine.
Be patient while the VMware player configures the installation of Windows 7 Virtual Machine.
Now you'll be given an option to download and install VMware Tools for windows. You can download or just skip it. Either is safe.
 Windows starts to load files and installation automatically begins. When it is completes, if you are connected to a network, then it will ask you to select the home group settings for that network.


Now you can see the Windows 7 desktop. :)
You can check the properties of your Windows 7 Virtual Machine by right-clicking on the Computer button in the Start menu and selecting "Properties" button. The screenshot below shows the hardware properties of  my Virtual Machine that I just installed.
If you want to close the Virtual Machine, all you have to do is shut down your Windows 7 Virtual Machine. This closes the VMware player also. Or as always you can just click on the cross button on the top-right corner. 
\
Installing a virtual pc software and setting up your Windows 7 Virtual Machine is that simple.


For more help, click on the Contact me page or just comment here. 


EVERY WANTED TO HAVE THE BEST APPS FOR YOUR COMPUTER ? CHECK THIS POST


The Artifex.

How To Setup a Virtual PC ?

In this how-to post, I am gonna tell you how to install a virtual PC in your computer.
Virtual PC is just like another new computer with its won operating systems. The only difference between a virtual PC and your computer is that virtual PC exists inside your computer. Your computer is a combination of hardware and software, but virtual PC is just software which behaves exactly like a fully functional computer.


There are a lot of virtual PC software on the internet. But the best ones are Microsoft Vitual PC and VMware Player.
I will be showing you how to install VMware player on your computer and I will show you how to setup a Windows 7 Virtual Machine.
Requirements:
1. VMware player. Click here to download
2. Windows 7 image. There are about hundreds of downloadable windows images over the internet. Choose as you like.


Double-click the downloaded VMware player installer.
Click Next in the windows that looks similar to the image shown below. 
Choose the destination folder to install the VMware Player. Default location will be in C drive. 
 If you have a working internet connection every time you log on, you can choose this option which will check for product updates every time you log on to your computer.
 This option enables an option which will automatic reports to VMware. This is perfectly safe. I would choose this option. 
 If you are thinking to use this software every now and then, you can place shortcuts automatically on the Desktop and Start menu by checking the respective fields.
 Click continue to start the installation of VMware player with your desired settings.
The setup requires you to restart your PC after completing the installation of VMware player.
This is how you install a VMware player or any other virtual pc software in your computer. It's that simple. In the next post I will show you how to install a Windows 7 Virtual Machine. 


The Artifex.

Related Posts Plugin for WordPress, Blogger...